This Swiss Cheese Chairis the firstonly 3D print file that I ever designed myself from scratch. Apparently, the folks at MakerBot headquarters in Brooklyn, NYC loved it! I texted Drew at MakerBot after this was posted, and he said since the print comes out so well and is a fast print, tons of people in the office printed them in different sizes and placed them around the office on their desks!
Super fun. The Swiss Cheese Chair Universe is arriving. Slowly. Print by print. It's a movement! Maybe I'll print one and send it to Bernie Sanders.
I don't have a MakerBot anymore, I have a couple of Ultimaker 2+ printers. I'll post the print from the Ultimakers later...I only have silver filament for now, though.
Now that I have your attention, if you haven't used Kahoot! in your classroom yet, you're in for a real treat. Kahoot! is full of user-created ready-made interactive quiz games that make Jeopardy buzzer systems completely and utterly irrelevant. Sorry, Alex Trebec. Here's the Kahoot! game that I used in my class today--try it out for FREE on the Kahoot! community board: https://play.kahoot.it/#/k/38ec8f09-d42a-497f-b4f9-68b009bbd586
If you like it, you can join Kahoot! (also free) and start playing right away. For how much? You guessed it: it's free. Student accounts--also free.
Students can use whichever device they have handy--but in my experience, the kids favor touchscreens because of the reaction-time advantage. You don't even need a projector, really, depending on your class size. I have used my HD laptop in a pinch. Today, this is what my 8th grade class looked like playing Kahoot!--we were waiting for a guest speaker to arrive and it was an engaging and fun activity as well as a good way to review material.
This is TWO class sections of eighth graders happy and busy
while they wait for our guest speaker to arrive! Yes! It really happens!
How it works: you choose a Kahoot! quiz to use and then Launch it to your device/projector. The students login using the URL and the login code to access your quiz in real time. They add their username (they do NOT need accounts--this is the best part). Once everyone joins the quiz, the quiz will launch!
Some fun music plays in the background while a question pops up on the big screen and on their devices. They have to wait a few moments until the multiple-choice answers pop up on the screen, and then they get access to punch in their response on their device.
One of the coolest parts of this is that it's really interactive in the whole-class sense. They aren't staring at the board or their device. They all have to constantly look up at the board and then down at their devices and then back at the board to see if they were right. The leaderboard is posted after every question--extra points for speed! It's not unusual for students to jump out of their seats with excitement as they see where they are in the lineup.
Kahoot! Markets itself as tool that can be flipped to let the kids create.
I teach a couple of PLTW courses and this Kahoot! is specifically for Automation and Robotics, Lesson 2.2.2 Mechanisms. Give it a try alone or with a few friends to see what Kahoot! is all about. https://play.kahoot.it/#/k/38ec8f09-d42a-497f-b4f9-68b009bbd586
You can create your own Kahoot!, customizing it for your particular classroom and lesson. You can easily embed photos and youtube videos that enhance your quizzes. What's fantastic, though, is there are thousands of user-created quizzes that are just waiting for your tweaks to make them perfect or you can use them as-is.
**FYI, I am not a paid spokesperson for Kahoot! nor do they sponsor me in any way. I just really like this tool.
Teaching Tools Series: Kahoot! in the STEM classroom--FREE
In a peculiar plot twist, for the last few years I've been a full-time STEM teacher. I teach engineering, robotics, computer programming and 3D modeling to middle schoolers. Best. Job. Ever.
In my 6th grade class, the students are learning computer programming using Scratch. I have a student that is quite a gifted animator. One assignment focused on creating a story, complete with a plot, theme, characters, conflict and resolution. She created a character for the story called Cake Troll.
I am obsessed with Cake Troll. I want to hug Cake Troll. I want to wipe his tears, he's so adorable. Here is the story:
https://scratch.mit.edu/projects/93197078/
This young lady is in 6th grade! Yeah, I know. She's a really gifted animator. Anyway, I wanted to share my project plans with you in case you'd like to do the same lesson with your students.
1. Engage interest in the lesson by showing a good short story. I like to use Disney's Tick Tock Tale because there's no dialogue to distract from the little clocks that are bursting with personality. It also enables kids to think more critically about story elements, because they are open to interpretation without dialogue. It's interesting how certain students will focus on the little clock feeling lonely, or left out and some won't pick up on that at all! Here's a clip:
2. Project this Story Map. Discuss each story element to remind kids of what they are (this is a STEM class, so I really depend on the Language Arts department for doing some seriously good teaching on story structure).
3. Watch the video again, if you have time, and fill in the map as you go (or afterward).
4. Explain that they will be programming stories in Scratch, but they need to plan out their story before they begin. One way to develop a good project is to plan it out. In Scratch, create a Studio full of projects that you think are good examples of short stories. You could also use this studio if you like, which is filled with projects that my own students created or projects that I just thought were cool--for better or for worse! Many of these kids are 11 or 12 years old, don't be too critical. Lots of them have never coded before.
5. Work in groups to brainstorm ideas and create a story map. Each student should make their own, or you can let them work in groups on the project. After they get you to check their work they can start coding on Scratch!
6. After they are done, gather all the projects in another Studio. I do this step by posting an assignment on Google Classroom and having them submit the shared link to their project as an ADD>LINK .
Share the link to the studio with your students (I use Google Classroom for this also).
Good Digital Citizenship (GDC)
7. In another class period, we share our projects and practice commenting using specific, constructive and supportive feedback.
STEM Studio: Coding a Story Assignment on Scratch--Free Lesson Plan and Worksheet!
Two amazing teachers at my school, Alison Jasgur and Sarah O'Mahoney, created this video for all teachers, administrators and staff in the US who are now administering the SBAC. SBAC tests are the new computer based tests published by the Smarter Balanced Assessments Consortium in conjunction with the changes to Language Arts and Mathematics standards in the Common Core.
Hey there readers!
Want a fun lesson to share with your friends, family, children or pets?
TED Ed challenged me (yes, I was there with them at the TED Ed HQ in New York...was AWESOME!) to produce a "lesson flip" on the Renaissance.
Each TED Ed flipped lesson has a video component, an online "quiz", additional links or online activities, a discussion question and some food for thought in the form of a famous quote on the topic.
Art materials feature largely in our home. My kids have watercolor easels, their own sketchbooks, pencil boxes and they are very particular about their pencil sharpeners. You have to know your pencil sharpeners to have a favorite. My husband is an artist and we have his, and his friends' large canvases, his grandparents' oil paintings, and his mothers' watercolors all around our home. We have a painting studio in our house. STEM has turned to STEAM around here. I also prefer to have the kids actually making something when they have screen time. Many people will happily listen to kids talk about art or comic strips that they made, but no one (I've done a survey) wants to listen to kids talk about levels they completed on Skylanders.
A comic my son created by using photos and tools.
Strip Designer
In our house, we are comic-book fanatics. My husband has been collecting comic books since he was a little kid. He grew up in Brooklyn in the 70s, when his parents would give him 35 cents to go to the corner store to buy a comic book with change left over for penny candy. Now we have an entire storage room in our basement dedicated to vintage and new comic books. We watch all the hero movies while my husband whispers each character's backstory into our ears as the film rolls on.
Strip Designer and our kids are a match made in heaven. They have many different templates, styles and tools that you can use to overlay on your own photography. The strip shown here that my son made took him about an hour or so with my help as photographer, but we were learning how the tools worked. Tools are robust, and would appeal to experienced artists as well as kids. There are advanced editing tools like layers and other fancy things that I don't know how to use.
As a mom, blogger and Science Technology Engineering (Arts) and Math teacher, I'm always checking out new math, science, puzzle or invention apps and trying them out on my children. Here's a list of the ones I or one of my children has obsessed over in the last month. I usually get my recommendations from Graphite, because I have a full time job at work, at home and I'm a coach (not for sports, for STEM, but more on that another day). Tinkerbox This jewel of an engineering app was brought into the world by Autodesk of AutoCAD fame. These folks over there are SERIOUS engineers and yet, my seven year old can play this game for quite a while. I love to watch him play. He loves the music and says he finds it calming and that it "helps him solve the problems".
Dragon Box after playing for 5 minutes
What I particularly love about this iPad app is that he is constantly in the "Develop and Prototype/Test the Solution" loop of the Engineering Design Process. This little guy adjusts the position of the catapult button or electric fan by a millimeter, tests it and then readjusts as many times as necessary until he achieves SUCCESS!
DragonBox 5+ and DragonBox 12+
Dude, the kids ask me to do Algebra. Every. Day. My 7 year old solved a multivariable equation for x (the dragonbox) after playing this game for 45 minutes. Zoinks! There are two versions, 5+ and 12+, according to age. Definitely play this game with your kid. It's math like it shoulda been! The sound effects and graphics remind me a little of World of Goo meets OmNom from Cut the Rope (both excellent STEM apps, also!) and the sound effect when you isolate the DragonBox is like a light saber! GeekDad at Wired Magazine went crazy over how it was better than angry birds.
That's all I have time for right now, gotta put the kids to bed and get ready to teach my Engineering & Design classes tomorrow! More tomorrow...
I haven't had a chance to post about the video production process much, but here is basically how it went down:
A friend nominated me on the TED-Ed website. You can nominate your friends, too (or yourself!) by clicking the "Get Involved" link.
Jordan Reeves, head of TED Ed, sent me an email to set up a time to talk on the phone about possibilities. At this point, they make it pretty clear that the whole thing is completely exploratory--no guarantees.
I agreed to try to write a script for a three minute video.
Discovered that writing a script for a good three minute video is really, really challenging.
Sent the script to the editorial team. Bit my nails for several weeks.
The editorial team decided that they liked the script! Hooray! I made it to round three. This one's easy--all I have to do is take a look at their suggested edits and check for scientific accuracy.
I have decided that all writers should have professional editors: I am not a writer, but their editing added a certain je ne sais quoi to the wording in my script. Definitely better than it was when I sent it.
Round Four: record the voiceover. Since I live close to New York City, and I was on vacation at the time, I made the trip down to the TED Ed offices in Chelsea to use their cute little recording booth. Rose, the science journalist and voiceover editor, directed me through the recording. I did not have to go down to the office--if you live far away, they send you a 'portable recording studio'.
Then, I have to wait. And bite nails more. They send the voiceover and script out to a group of selected professional animators and wait until an animator chooses a voiceover. If you don't get chosen, that's the end of that. The reason the animators have the choice is because they often put in many MANY hours to put the videos together--and these are real professional who are volunteering their work hours (kind of like the teachers that put the lessons together). Some of these guys/gals work for places like Pixar and Dreamworks. Others just rock on their own.
Then, we work together...emailing back and forth for weeks. He sends me animated sketches (animatics) and stills to get my feedback and so I can check for accuracy. He did an amazing job of interpreting some difficult places in the script. I never even saw what he looked like until his picture was posted on the TED site! He's got cool hair.
Our Second Annual Periodic Table of Cupcakes was a success!
If you want to do this sort of project these are things to keep in mind:
Give students plenty of time to plan the project, shop for materials (parents don't like last minute requests) and to make the items that need to be made ahead of time (cupcakes/fondant icing). We have used a full period to plan it two weeks in advance. This gives you plenty of time to send a notice home, and plenty of time for parents and kids to shop and make things.
This year, it took a little longer to build the table. I underestimated the difference in construction time that 4 fewer students would make--keep that in mind when you're doing this sort of project in your classroom. I use our 90 minute block period for table construction (with the cupcakes and fondant icing already made). Last year, with 11 students we finished it with time to take pictures and clean up. This year, with 8, it took two hours, PLUS clean up time. If you have a group of 20 students, with good planning you should be able to get it done in one class period.
Make sure you have one copy of the periodic table per student. If you want the names of the "newest" elements, check online. Unununium has a new name now, and so do a few of the others! Mendelevium, Livermorium and Copernicium are a few.
I suggest doing this project towards the end of a unit on the periodic table. A great way to introduce the periodic table is by explaining why Dmitri Mendeleev's creation was so extraordinary...use this TED-Ed Video to start it off right!
Edible Science Model Projects, Part 6: 2nd Annual Periodic Table of Cupcakes
I recommend showing this TED talk to all of your middle school students. Amy Cuddy discusses how to change your life by changing the position of your body for 2 minutes! My seventh graders absolutely loved this video: they had a quiz in French class right after their science class, so we spent the final three minutes of our class in a POWER POSE to lower cortisol levels and elevate testosterone!
Photo from Amy Cuddy's TED Talk showing an example of the POWER POSE that we used in class.
I also liked this video because it tells the story of how personal experience shaped Dr. Cuddy's research and the problem that she investigated. For those teachers who are focusing on teaching the scientific method, she clearly shows a slide that is her Problem Statement and discusses her hypothesis, as well as details on her experimental methods. She also displays graphs of her experimental measurements (hormone levels).
This is AMAZING! My 7th grade students loved this TED talk...
- What happens during ordinary cell division - mitosis?
- What happens when a cell dies inside our body?
- How does the body know when to make new cells?
- What are the different phases in mitosis?
- In what order does cell division occur and what ensures that nothing wrong happens?
- How can a cancer tumor be formed?"
Teaching Tools Series: Cell Cycle Game for Middle School from NobelPrize.org
I love Quizlet! My students love Quizlet even more. I copied someone else's set on Quizlet, and made this new set--added a few images and Voila! Flashcards for you.
My students especially like that you can print out flash cards or an alphabetized list...and the GAMES! Their favorite on the SMARTboard is the Scatter game. It's a fun way to study.
Teaching Tools Series: Quizlet Flash Card Set for Mitosis
A beautiful tradition at my small, independent Montessori school is of breaking bread with the entire school community (toddlers, middle-schoolers, teachers and staff) on the day before Thanksgiving.
This year, in 7th year science class, we made a Hand-Kneaded Whole Wheat Bread, and had some science lessons along with it. I do this with the 7th years because they already had life science with me last year, and they understand anaerobic cellular respiration, proteins in living cells and cell division already. I got the recipe from Cooks Illustrated (a science lab of cooking!) and the science to go along with it from various sources.
Here are the loaves prior to baking (student-made!):
Last year, we did a Cell Cake Project in the grand tradition of edible science model-making! It was a tremendous success, and it remains the most popular post on my blog by far!
This year's newest member of the project; The Bacterial Cell
This year is the second year of the project, and I decided to make it meatier (or cakier, or whatever) by adding a research and presentation component to it, as well as adding critical thinking to the project by adding different cell types and asking students to compare and contrast them.
"Remember, the primary goal of this project is to describe the similarities and differences between animal, plant and bacterial cells. "
http://www.johnkyrk.com/CellIndex.html--this site has several links in the drop-down menu that could be useful in identifying additional structures or more detailed explanations that would be helpful in making your poster/model. For example http://www.johnkyrk.com/golgiAlone.html has detailed descriptions of how the Golgi body works.
**Wikipedia: http://en.wikipedia.org/wiki/Cell_(biology)--this site can be used as a STARTING PLACE to find information. Keep in mind, that Wikipedia has gathered it's information from other places...those places are listed (with links) at the bottom of the page. Those are the links that should be used in your research forms, NOT "en.wikipedia.org".
I have a new role model and her name is Joan Le, author of science-teaching blog extraordinaire, The Science Room. I haven't met her in person, and I don't need to in order to appreciate her innovative integration of technology into her classroom. This flashcard set on Quizlet is a gift from her, that I am posting so more people can find it.
Teaching Tools Series: Quizlet Flashcard Set on Moon Phases, Eclipses and Tides
My last post on teaching the reason for the seasons in middle school focused on the biggest misconception of most people when it comes to the concept, and an excellent curricular resource that I have successfully used for years to help teach this concept that is difficult to teach. It is difficult to teach mainly because of the misconceptions that many people (including very smart people--some of them are teachers!).
I didn't even talk about the ACTUAL reasons--I spent all of my time on UNTEACHING a misconception, which is one of the challenges of being a science teacher! Kids come to us with all sorts of ideas about how the world works, and we have to ensure experiences that help them understand what is right about their models and what ideas need, ahem, "reworking". So here they are:
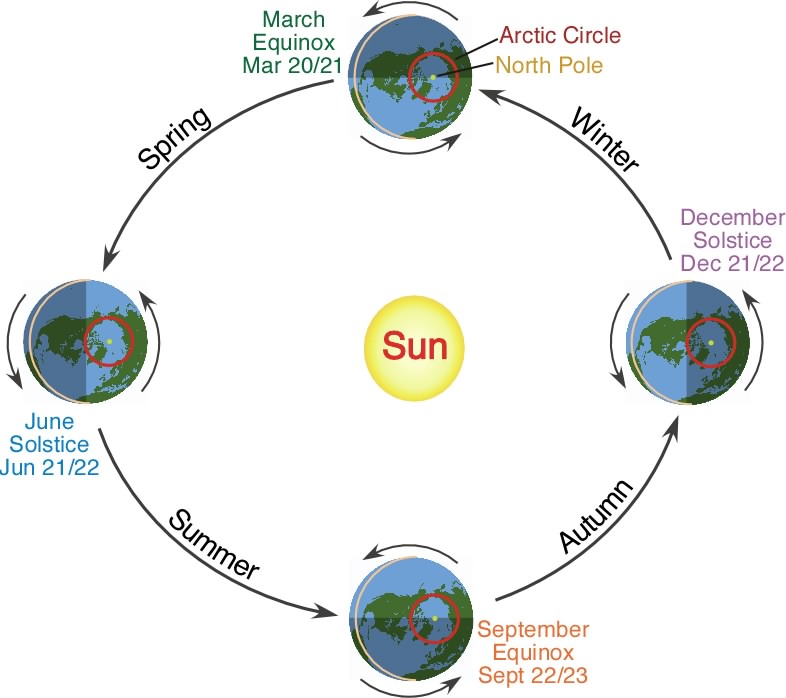
1. The big, overarching, reason for the seasons is that the Earth is tilted 23.5 degrees from vertical on its rotational axis; and the Earth revolves around the Sun with the axis always pointing in the same "direction" in space. This results in several phenomena:
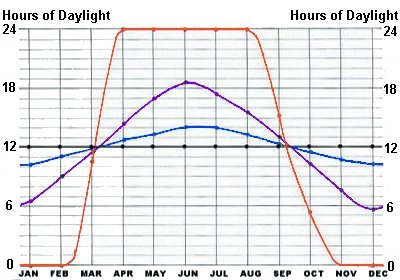
The number of daylight hours a region receives varies based on latitude and season. If the Earth were not tilted, it would be like an equinox every day: 12 hours of sunlight and 12 hours of darkness. In the northern hemisphere, in summer, Connecticut gets around 15 hours of daylight each day and 9 hours of darkness. As you move north in latitude, the number of daylight hours in summer increases, so Anchorage, Alaska would get 19 hours of daylight on the same day that Jacksonville, Florida gets 14.
When there is daylight on a part of the Earth it warms up. When there is darkness, it cools off. In the summer, New England warms up for 15 hours or so and then cools off for 9 hours. It warms for longer than it cools...this happens day after day after day so there is an overall warming effect. In the winter, the opposite happens: there are many more hours of cooling time--15 hours of darkness--than warming time (9 hours) and day after day, this results in a cooling effect.
2. The other reason for the seasons is that the Earth is a sphere and so the solar intensity per unit of surface area differs based on latitude and time of year. If daylight hours were the only thing that determined the average temperature at a certain latitude, then areas above the Arctic Circle would be the hottest places on Earth in Northern Summer, because it receives 24 hours of daylight (see chart above). So, there has to be some other factor at work here: many equatorial regions only have two seasons--hot and wet or hot and dry! It's always hotter there than at the poles. The solution is solar intensity per unit of area which changes based on the angular height of the sun.
Angular height of the Sun in the sky changes throughout the day, with the Sun at it's highest point at solar noon; it also changes throughout the year, as shown in these diagrams:
Angular height of the Sun at 40 degrees Northern Latitude at different times of the year.
Solar intensity changes in proportion with angular height. A great activity to do with students is using a flashlight held at constant height over a piece of graph paper. Trace the outline of the circle of light and then tilt the flashlight slightly. The new shape is an oval with a much larger surface area (count and compare the squares) over which the same amount of light is spread. So the solar intensity per unit of area in the image to the right is much less.
Now my post is too long, and I have to teach a class in 5 minutes!
Difficult Concepts: Teaching the Reason for the Seasons in Middle School